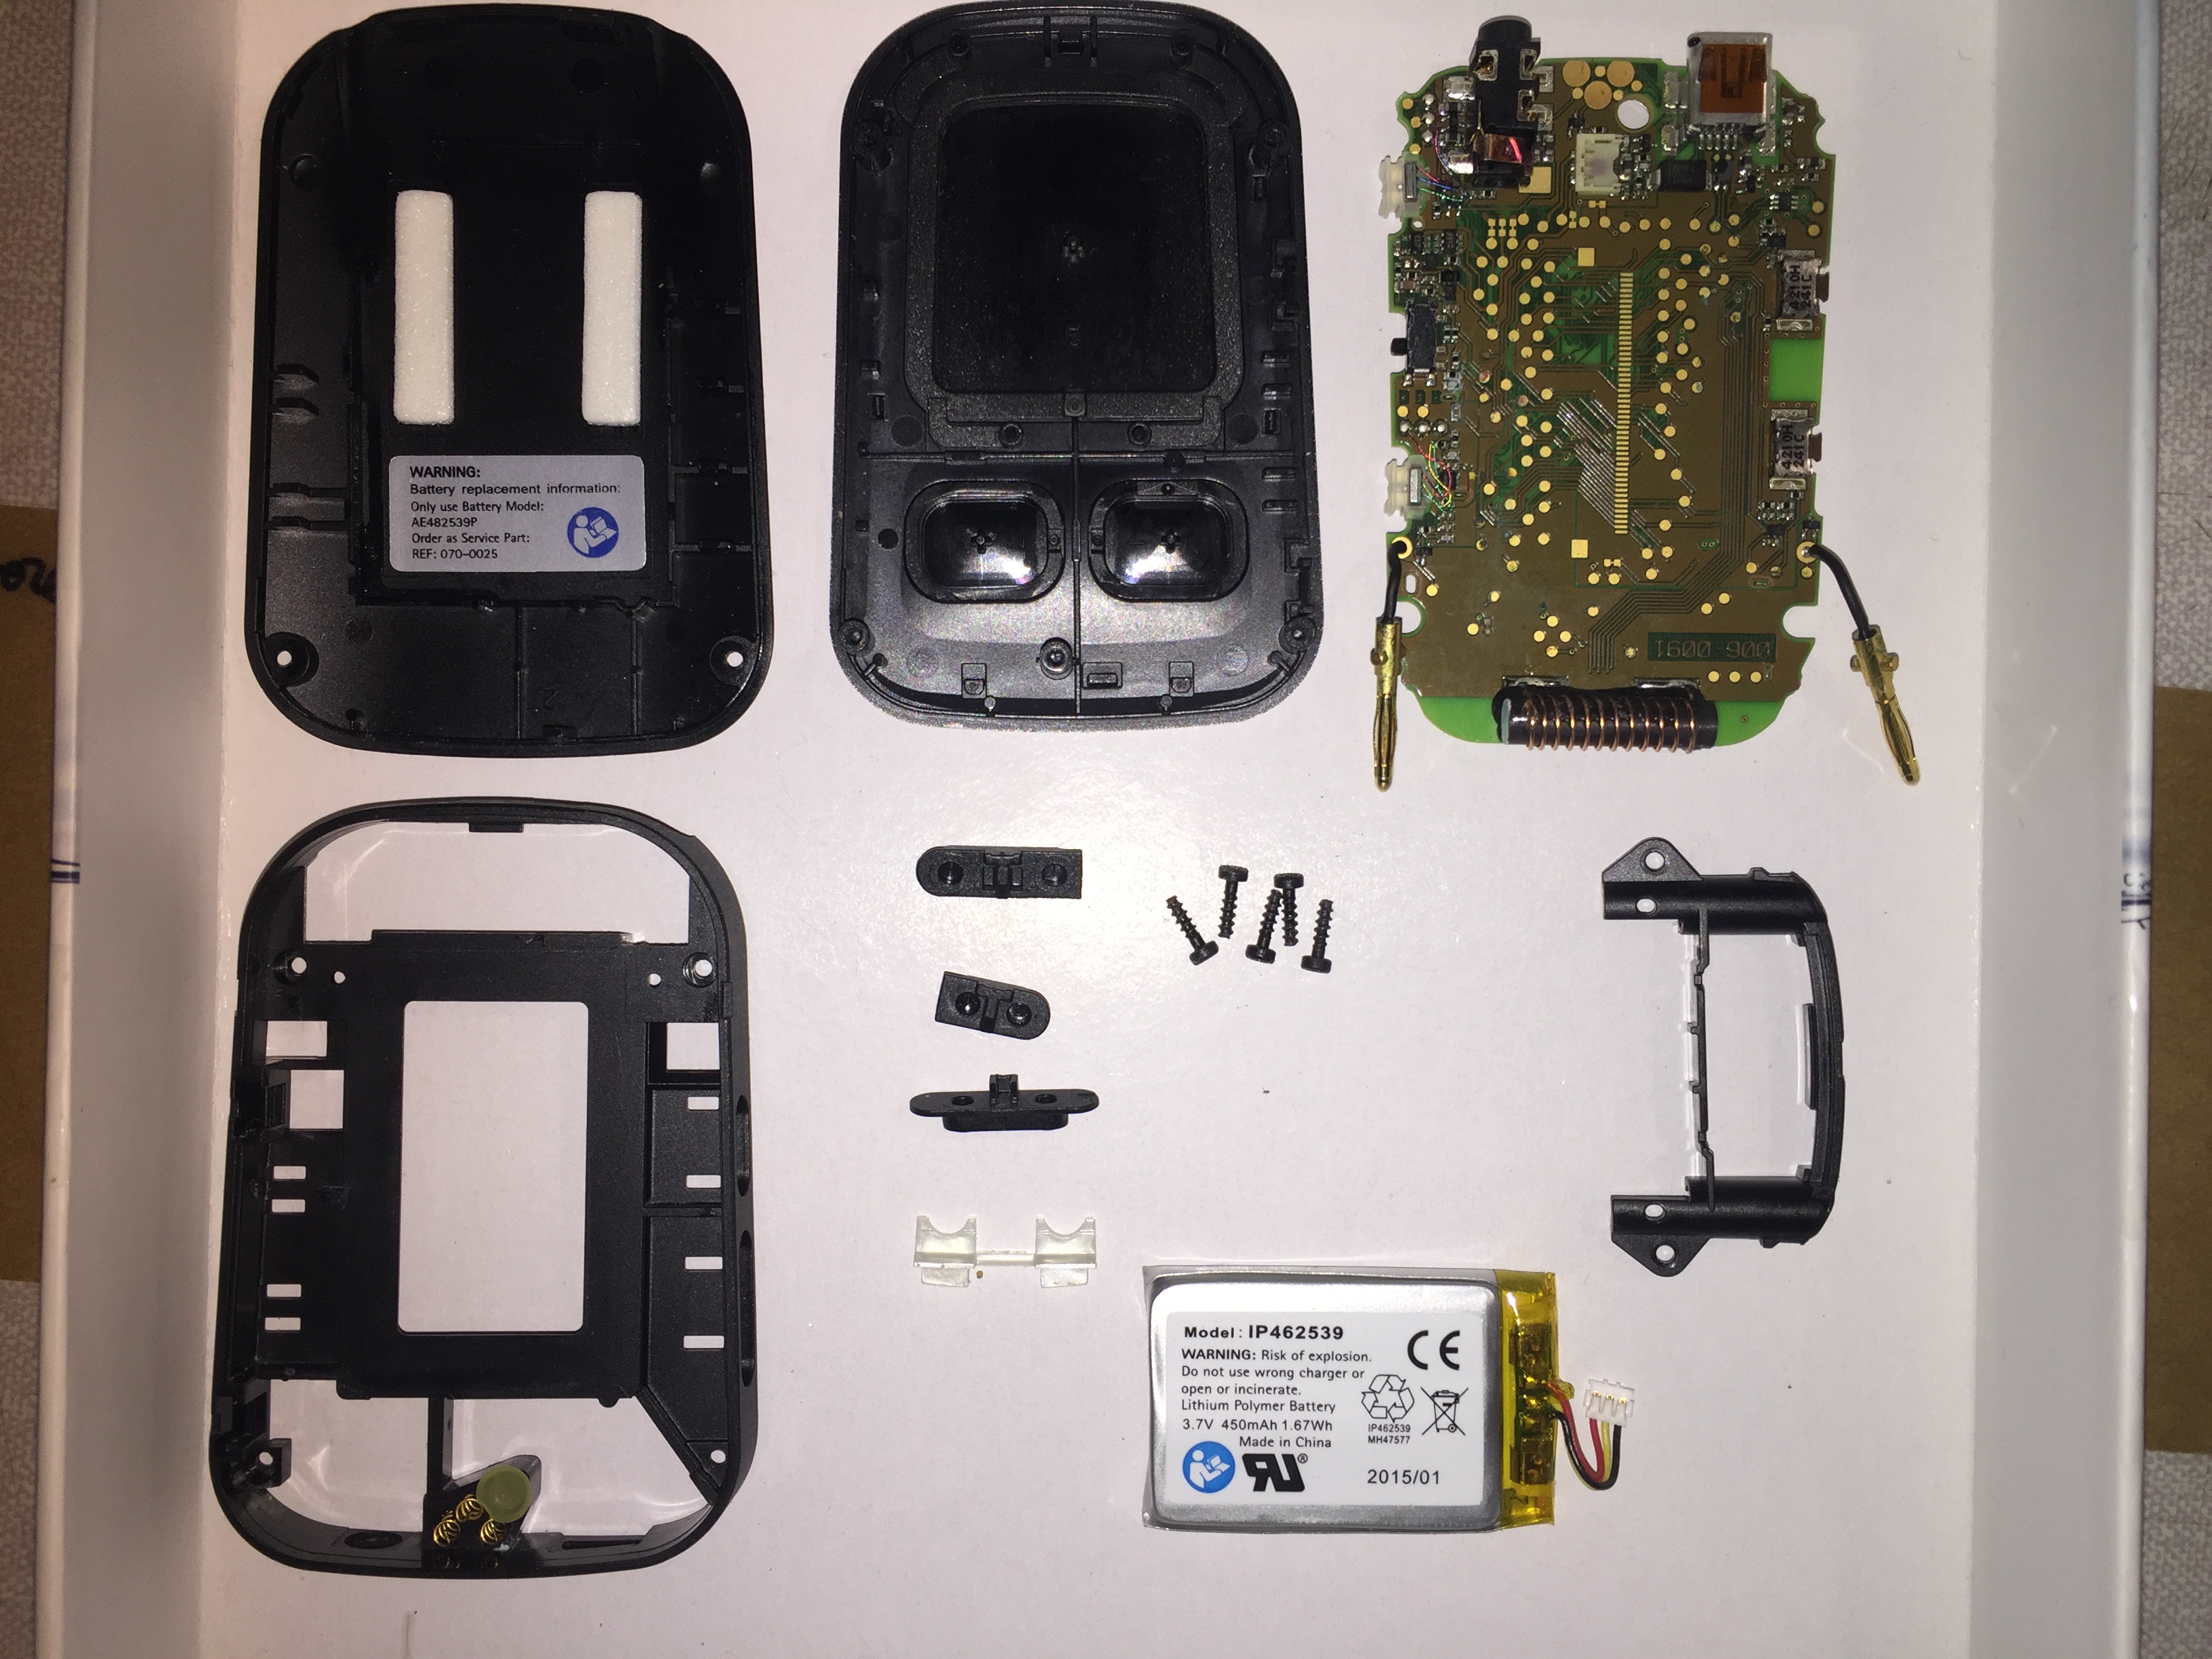
Yesterday, my woman almost managed to stifle a laugh, when I bent forward and plunged my Phonak ComPilot 2 into my very nice Calvados. Even though alcohol isn’t that bad for equipment, I did warn her that the rest of the contents of Calvados likely would result in damage. This afternoon the device worked flawlessly until it didn’t and I had to open it up and clean it:
(The plastic plug in the lower left part next to the springs for the euro plug was put there by my daughter. So it will probably not appear, when you disassemble the ComPilot 2.)
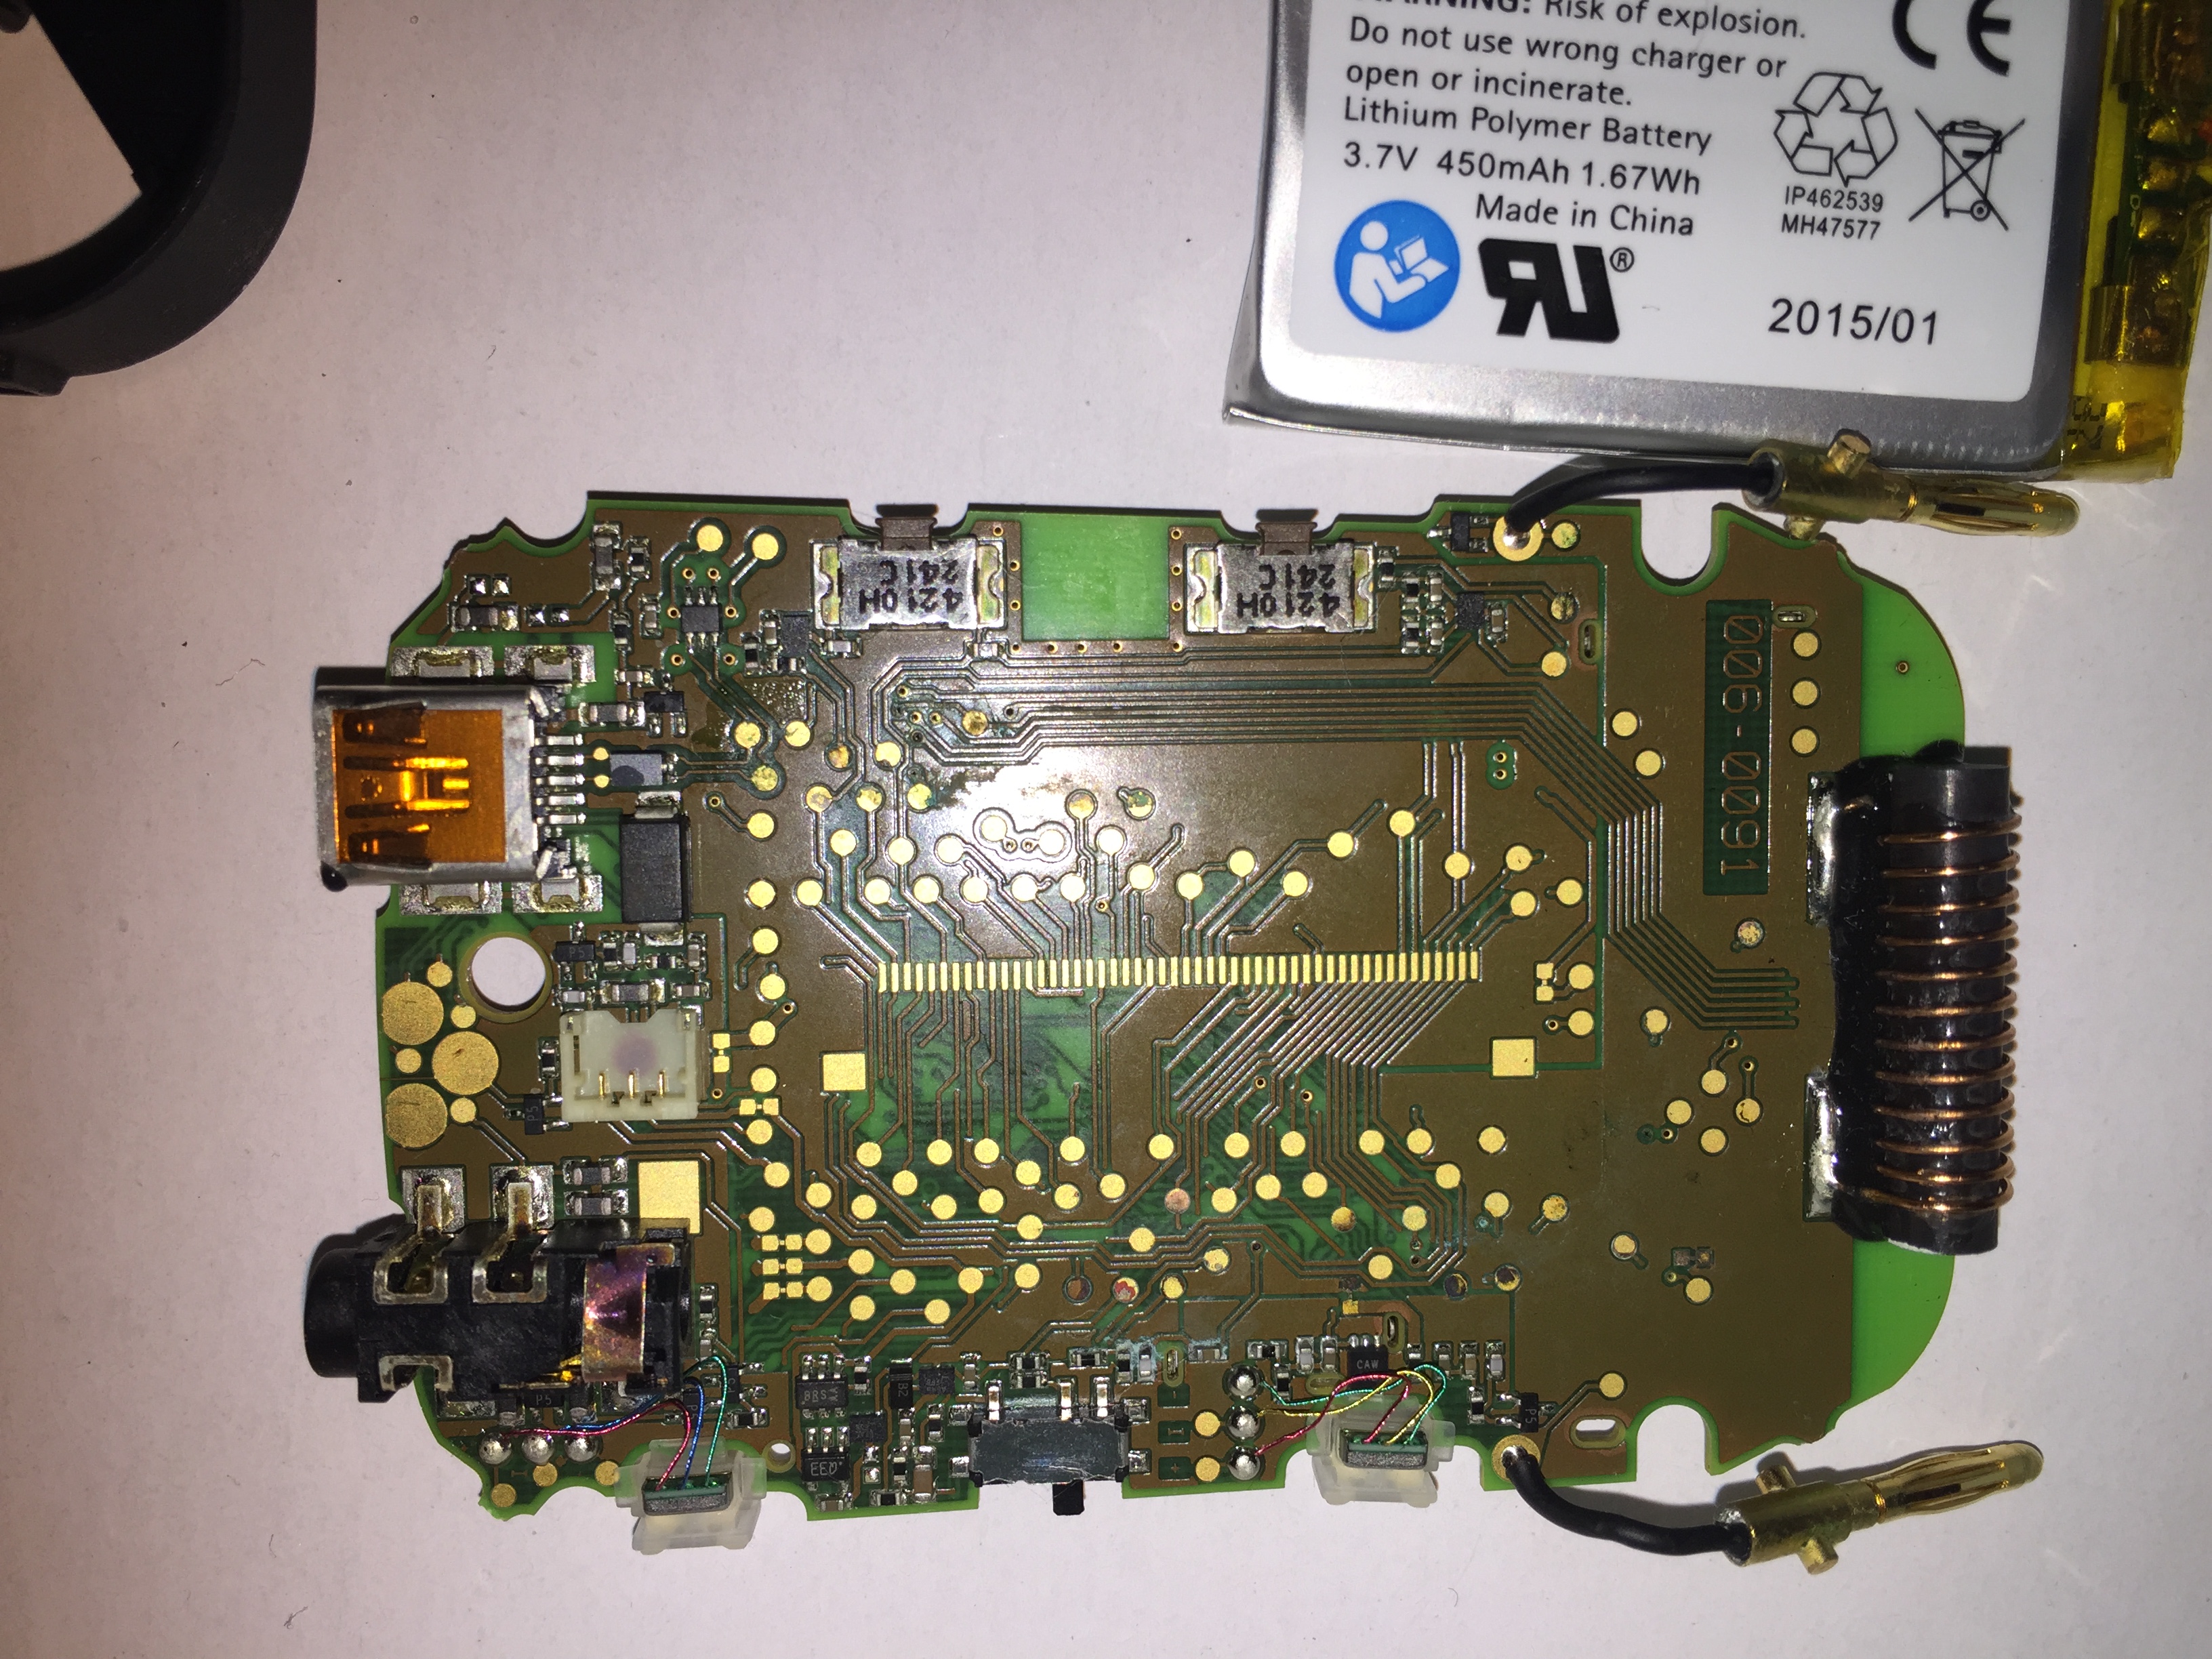
It was very hard to disassemble and quite easy to assemble. I quess that it was glued together by the remains of the Calvados. The PCB had bluish stains, so I cleaned it with isopropyl alcohol and cotton swabs.
I also thoroughly rinsed the 3 switches with drops of isopropyl alcohol. The home button was less responsive the last weeks and that’s fixed, too.
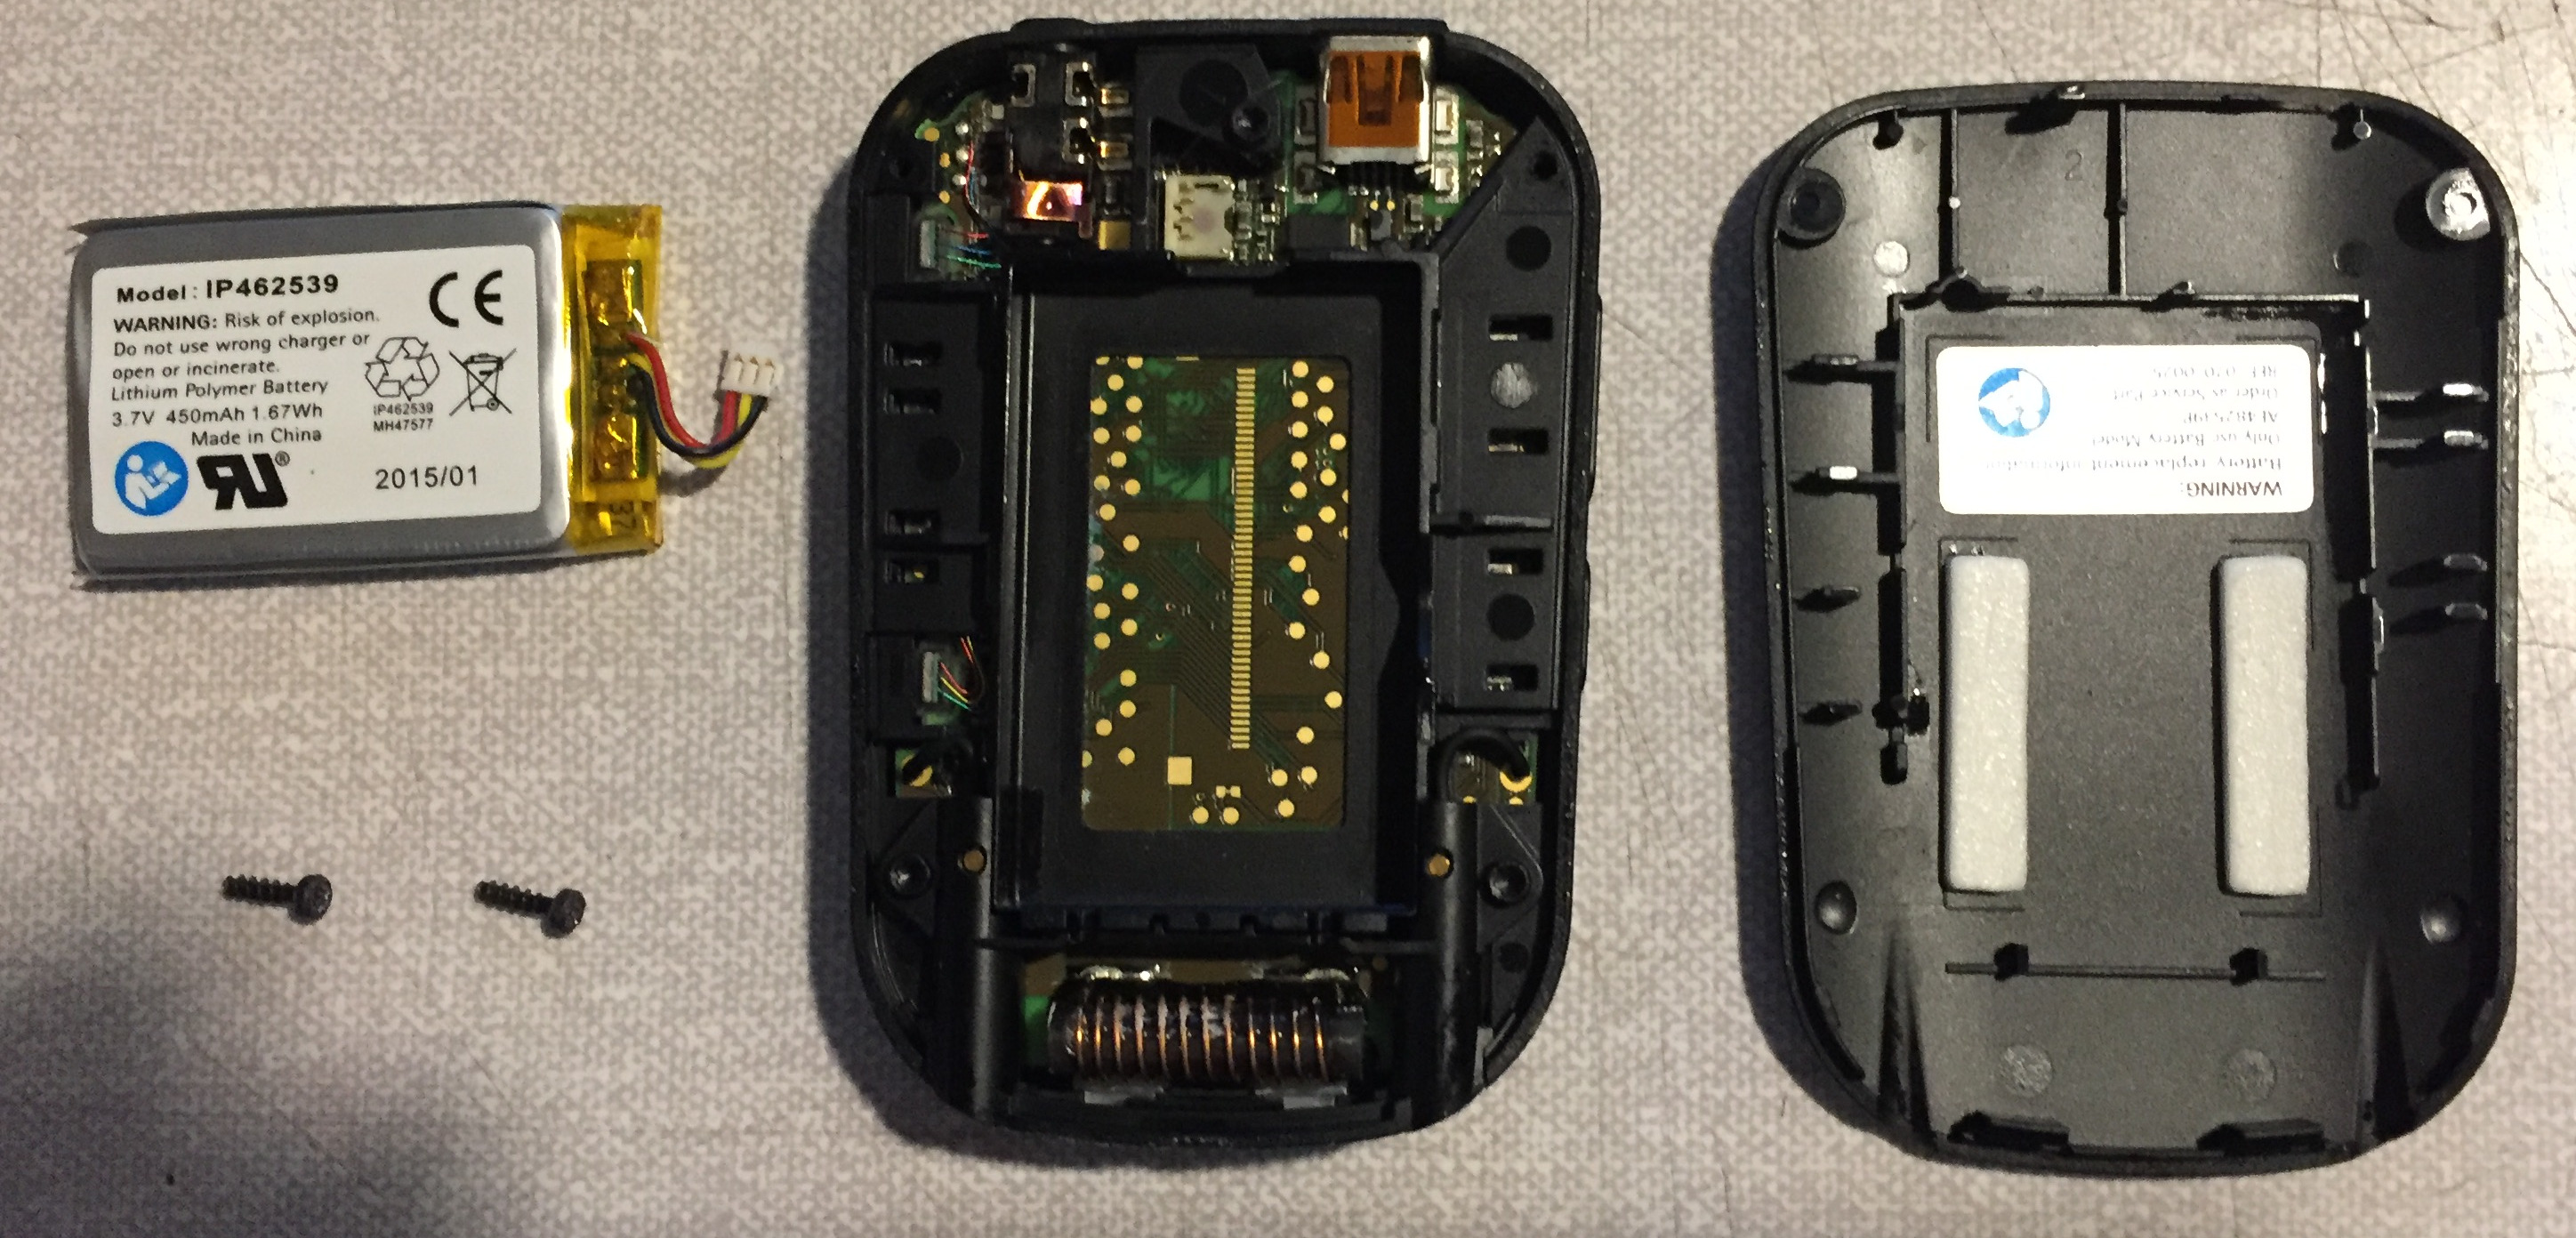
The battery is a IP462539. So it should be 25mmx39mmx4.6mm. I measured 24.2mmx38.2mmx4.8mm. The battery compartment is 25.6mmx40.7mmx5.6mm.
I haven’t found a 3-wire replacement. Only a 2-wire here and here, so that would require soldering.
Looking at the plastic compartment, you could remove the sides and place a larger battery there. But not much larger.
Awesome. You forgot to un-solder the metal RF shields so we could see the chips
I opened my Starkey USB Surflink Programmer at one point. This is the 900Mhz wireless unit. Curiously it had two different radios, one for the North American “free” 900MHz ISM band and one for the EU ISM band. They are slightly different frequencies but they felt it was better to put two radios in every unit rather than sell different models. I don’t recall how they were selected.
Thanks Tenkan.
That’s a rather excessive price tag! And it’s a used item, too. You are better off buying a used ComPilot 1 for 30€: Then you get a replacement neck loop, too.
You right! They’ve gone up in price in the Netherlands on www.marktplaats.nl, too.
Well, I am not afraid of soldering or point-welding, so I’ll stick with the new for less than 5$ from Asia.
Still, I can’t believe there isn’t a battery with internal protection (3 wires) on AliExpress with the right plug and right dimensions.
Actually I have in the past used the battery from the Unitron UDirect, which of course is the compilot in disguise, these go for a lot cheaper as there not as popular.
After one day the ComPilot died on me again: Crackling sound and not able to turn on again.
If I power it via an USB with the battery connected, it works. However, even though the battery gives 4.1V without load the ComPilot dies instantly with only the battery or the USB cable connected.
Thanks! Good photo too. Did you have to desolder them or were they clipped in somehow? I’m reading a book on the STM32F103 now as it turns out. I recognize the radio CSR - Cambridge Silicon Radio. Now a part of Qualcomm.
After the second shutdown I’ve left the PCB in isopropyl alcohol for the night. After which I have given it 2 drying cycles in my hearing aid dryer. It clean and dry now. (This was the reason for removing the shields.)
This piqued my interest because i’m dealing with long-running corrosion issues on my ComPilot1 at the moment.
It looks quite similar to the ComPilot1, although there’s a few differences that I note, primarily the radio side (top shielding can by the antenna) is different, and that the STM32F103 part is a BGA part with the solder balls/connections on the underside of the chip as opposed to the TQFP package I have in my ComPilot1 where the chip has legs and you can visibly see and access the solder joints.
Given the STM32F103 is the BGA version here I suspect if you’re gonna have further troubles, it’ll be liquid or other residues remaining underneath the chip and bridging the solder balls that affix the chip to the board - it’ll wick up inside the gap between the chip and the PCB quite nicely but end up being a pain to get out. If it’s giving more hassle after what you’ve already tried, it might be an idea to flood the undersides of both the STM32F103 and the CSR radio with isopropyl, but then use some compressed air to blow out both corrosion debris, and the alcohol from the tiny gap between the BGA package and the PCB.
The proper fix in a case of having corrosion/debris underneath the BGA chips would be to use a hot-air pencil to remove the chips, clean up the board and the chips, then re-attach them to the board, but that’s quite an involved process - chips with legs are much nicer to deal with because often some alcohol and a fiberglass pencil could remove residues bridging the legs! I’d probably not attempt a BGA repair myself as my hands just aren’t steady enough these days, and BGA rework is often quite hard!
Something I really wish Phonak had bothered with on these (especially where there’s BGA parts!) is a conformal coating over the PCB assembly, although with the pads for the DAI socket and the switches, it would definitely be a pain to do as the coating would cover the pads for the socket and wick-up into the switches making them quite useless. However a conformal coating would help prevent liquid ingress underneath the BGA parts as well as protect legs of adjacent components from corroding if exposed to ambient moisture such as sweat. I’m posting off my replacement ComPilot1 to a friend later this week to get the board conformal-coated to see if that actually helps preserve longevity as I identified a lot of corrosion inside my old one just from sweat the last time I opened it up to see why it was sulking. A conformal coating would have probably helped both of our cases!
I hope your efforts so far have saved it, after all what you’ve done so far is all quite correct - but if not do pay attention to getting IPA and some air flushed into the gap between the BGA parts and the PCB to rinse them out, and good luck!
My 6 year old son uses one of these in school…the other day he went the washroom/water closet…yes the unimaginable fell in! The school immediately plugged it in and fried the battery. I was able to buy a new battery by when I attached it the small plastic piece on the PCB that hold the battery wire broke.
I think that you mean the “socket” for the battery? So the connection from the battery isn’t being made with the board anymore?
I don’t really see the advantage of removing the socket, sourcing a new one and soldering that one on. If you can find someone who is good at soldering, you could remove the plug and socket and solder the wires directly onto the PCB. But it’s tiny!
That being said, if I really wanted the part I would start trying to identify it at Mouser and than try to find it at AliExpress.
Hello. Something similar has just happened to me with a tasty cappuccino. My Compilot II barely submerged a little and only for an instant from the bottom. I cleaned and dried it externally immediately. It continues to work but works partially. The volume and program switch buttons don’t work quite right. The device only requires an internal cleaning to work properly. Could you explain the disassembly procedure? I don’t want to break something in the attempt. Receive a greeting from Mexico. Thank you for your valuable help.
Just unscrew 4 times and pry it open. The plastic casing should be easy to take apart. However, mine stuck together fiercely due to Calvados.
Take care to use a plastic tool to pry the casing apart, e.g. some membership card.
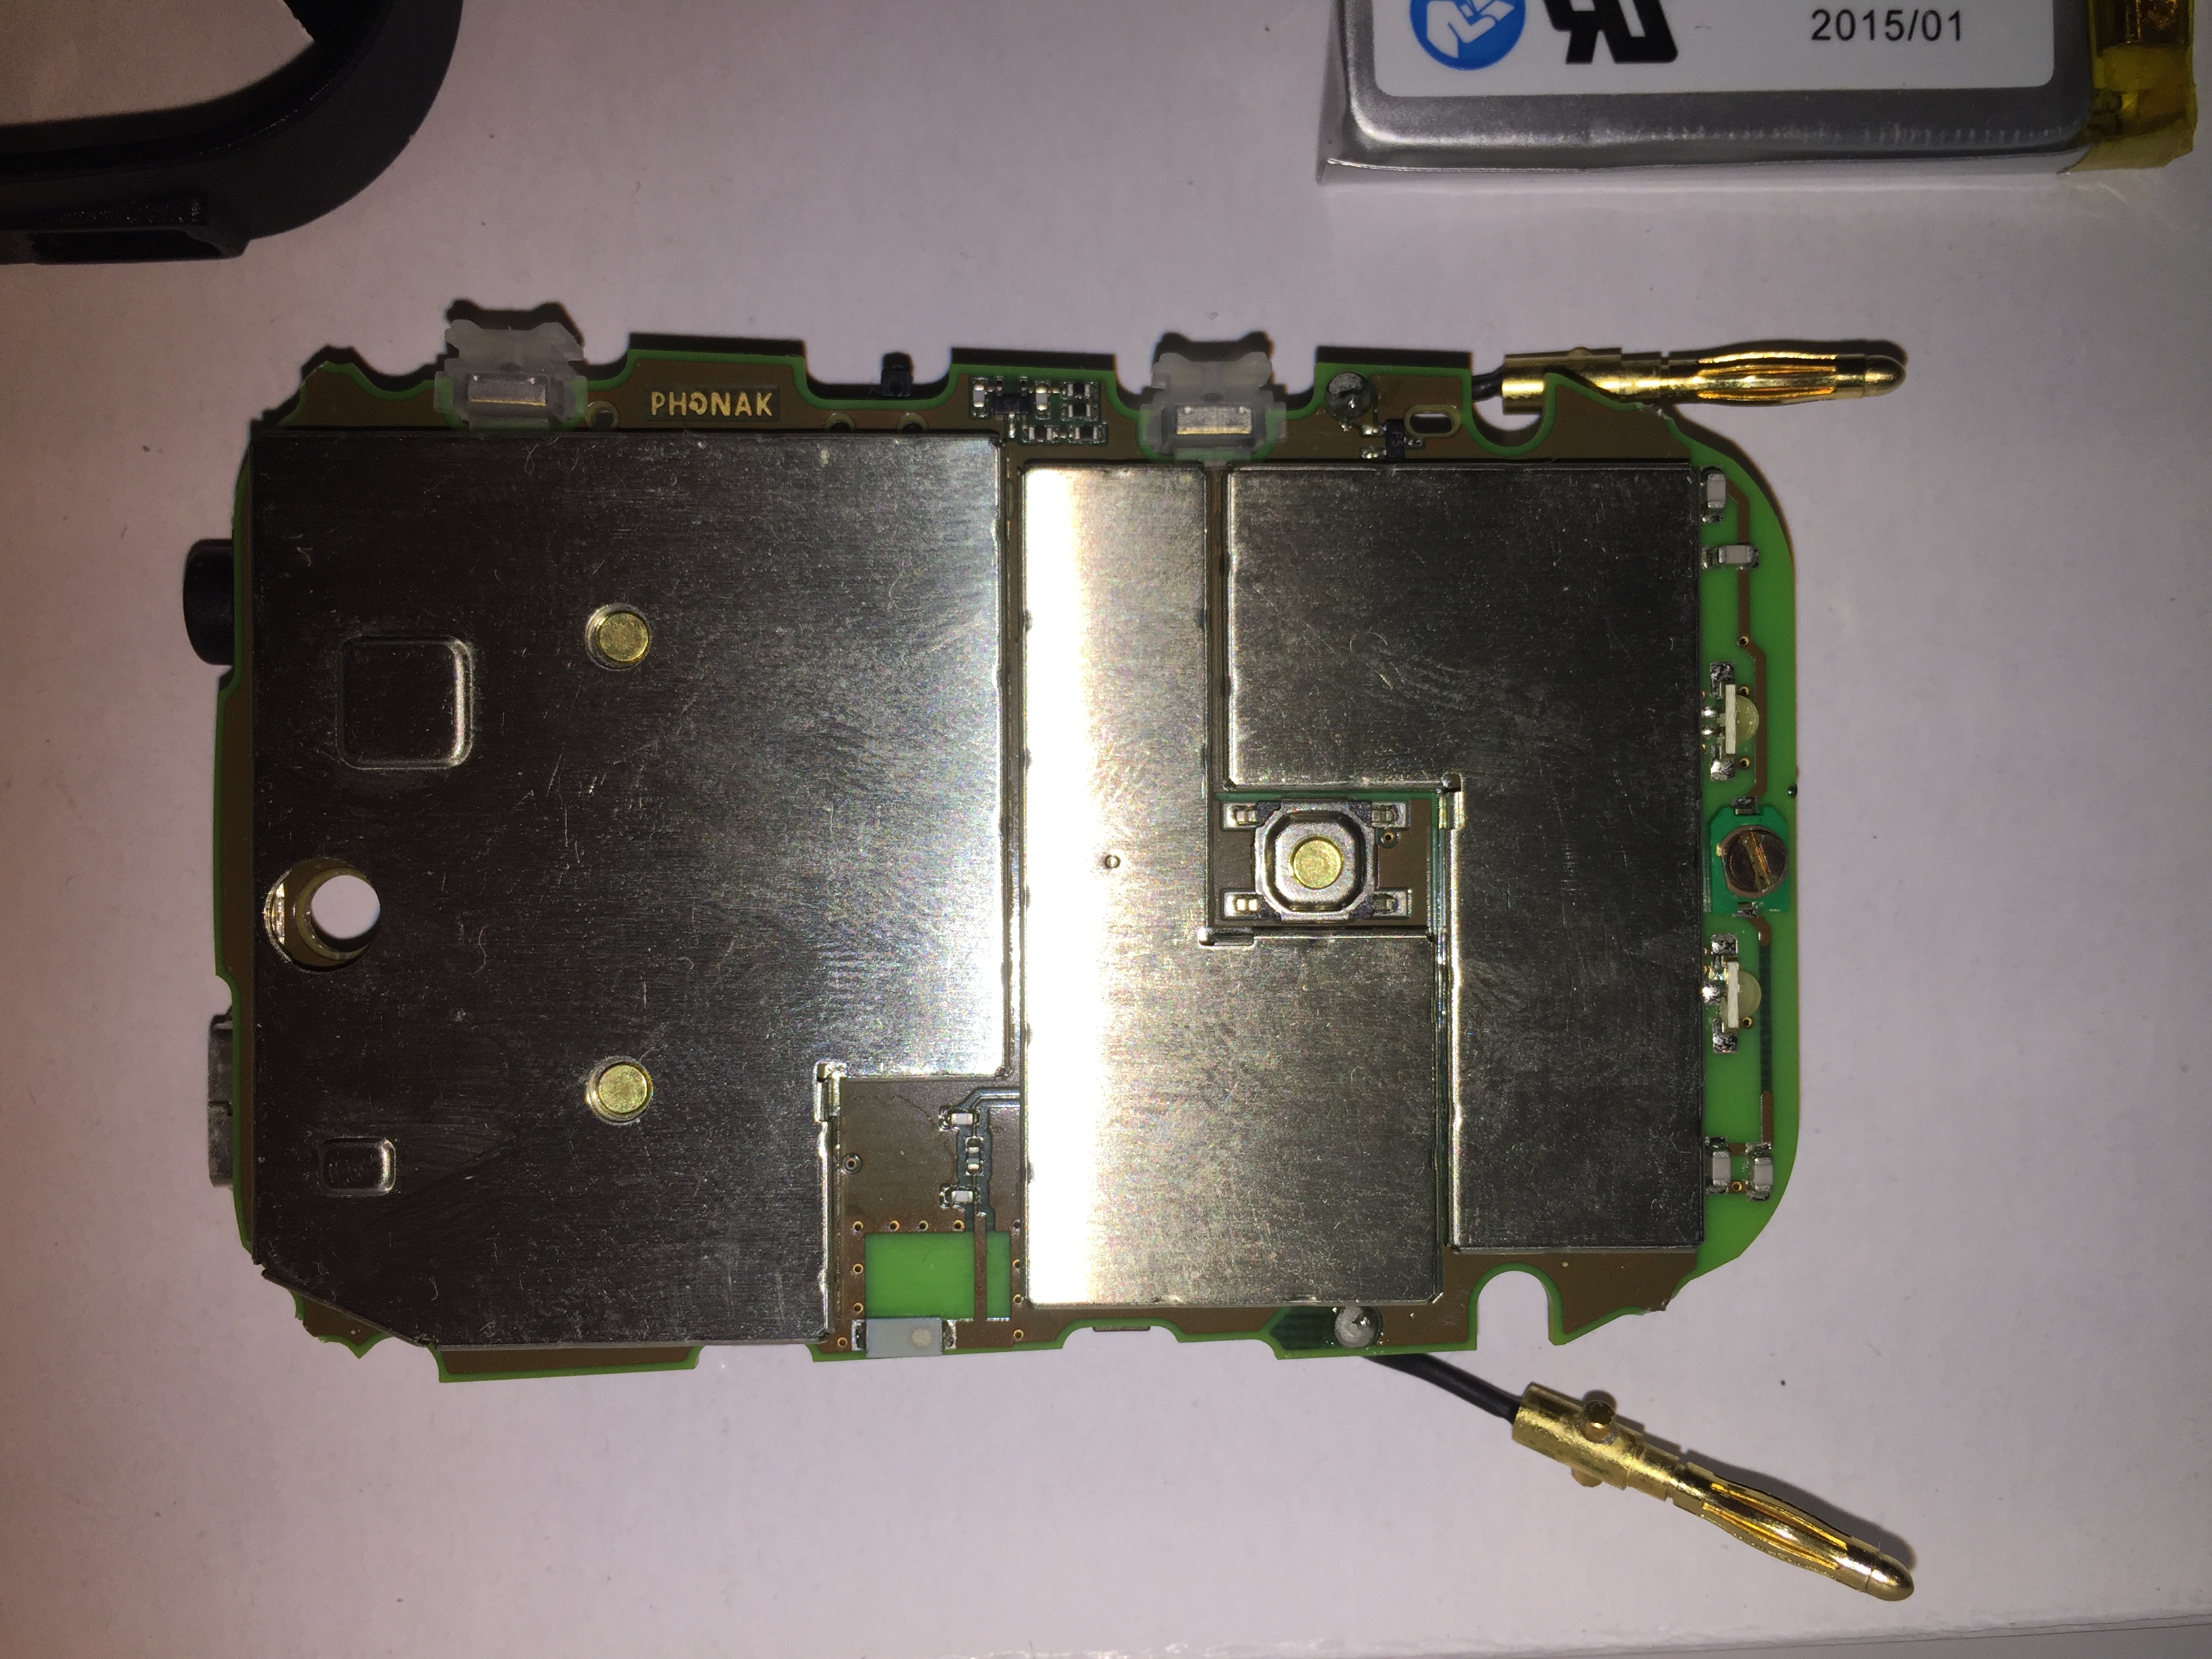

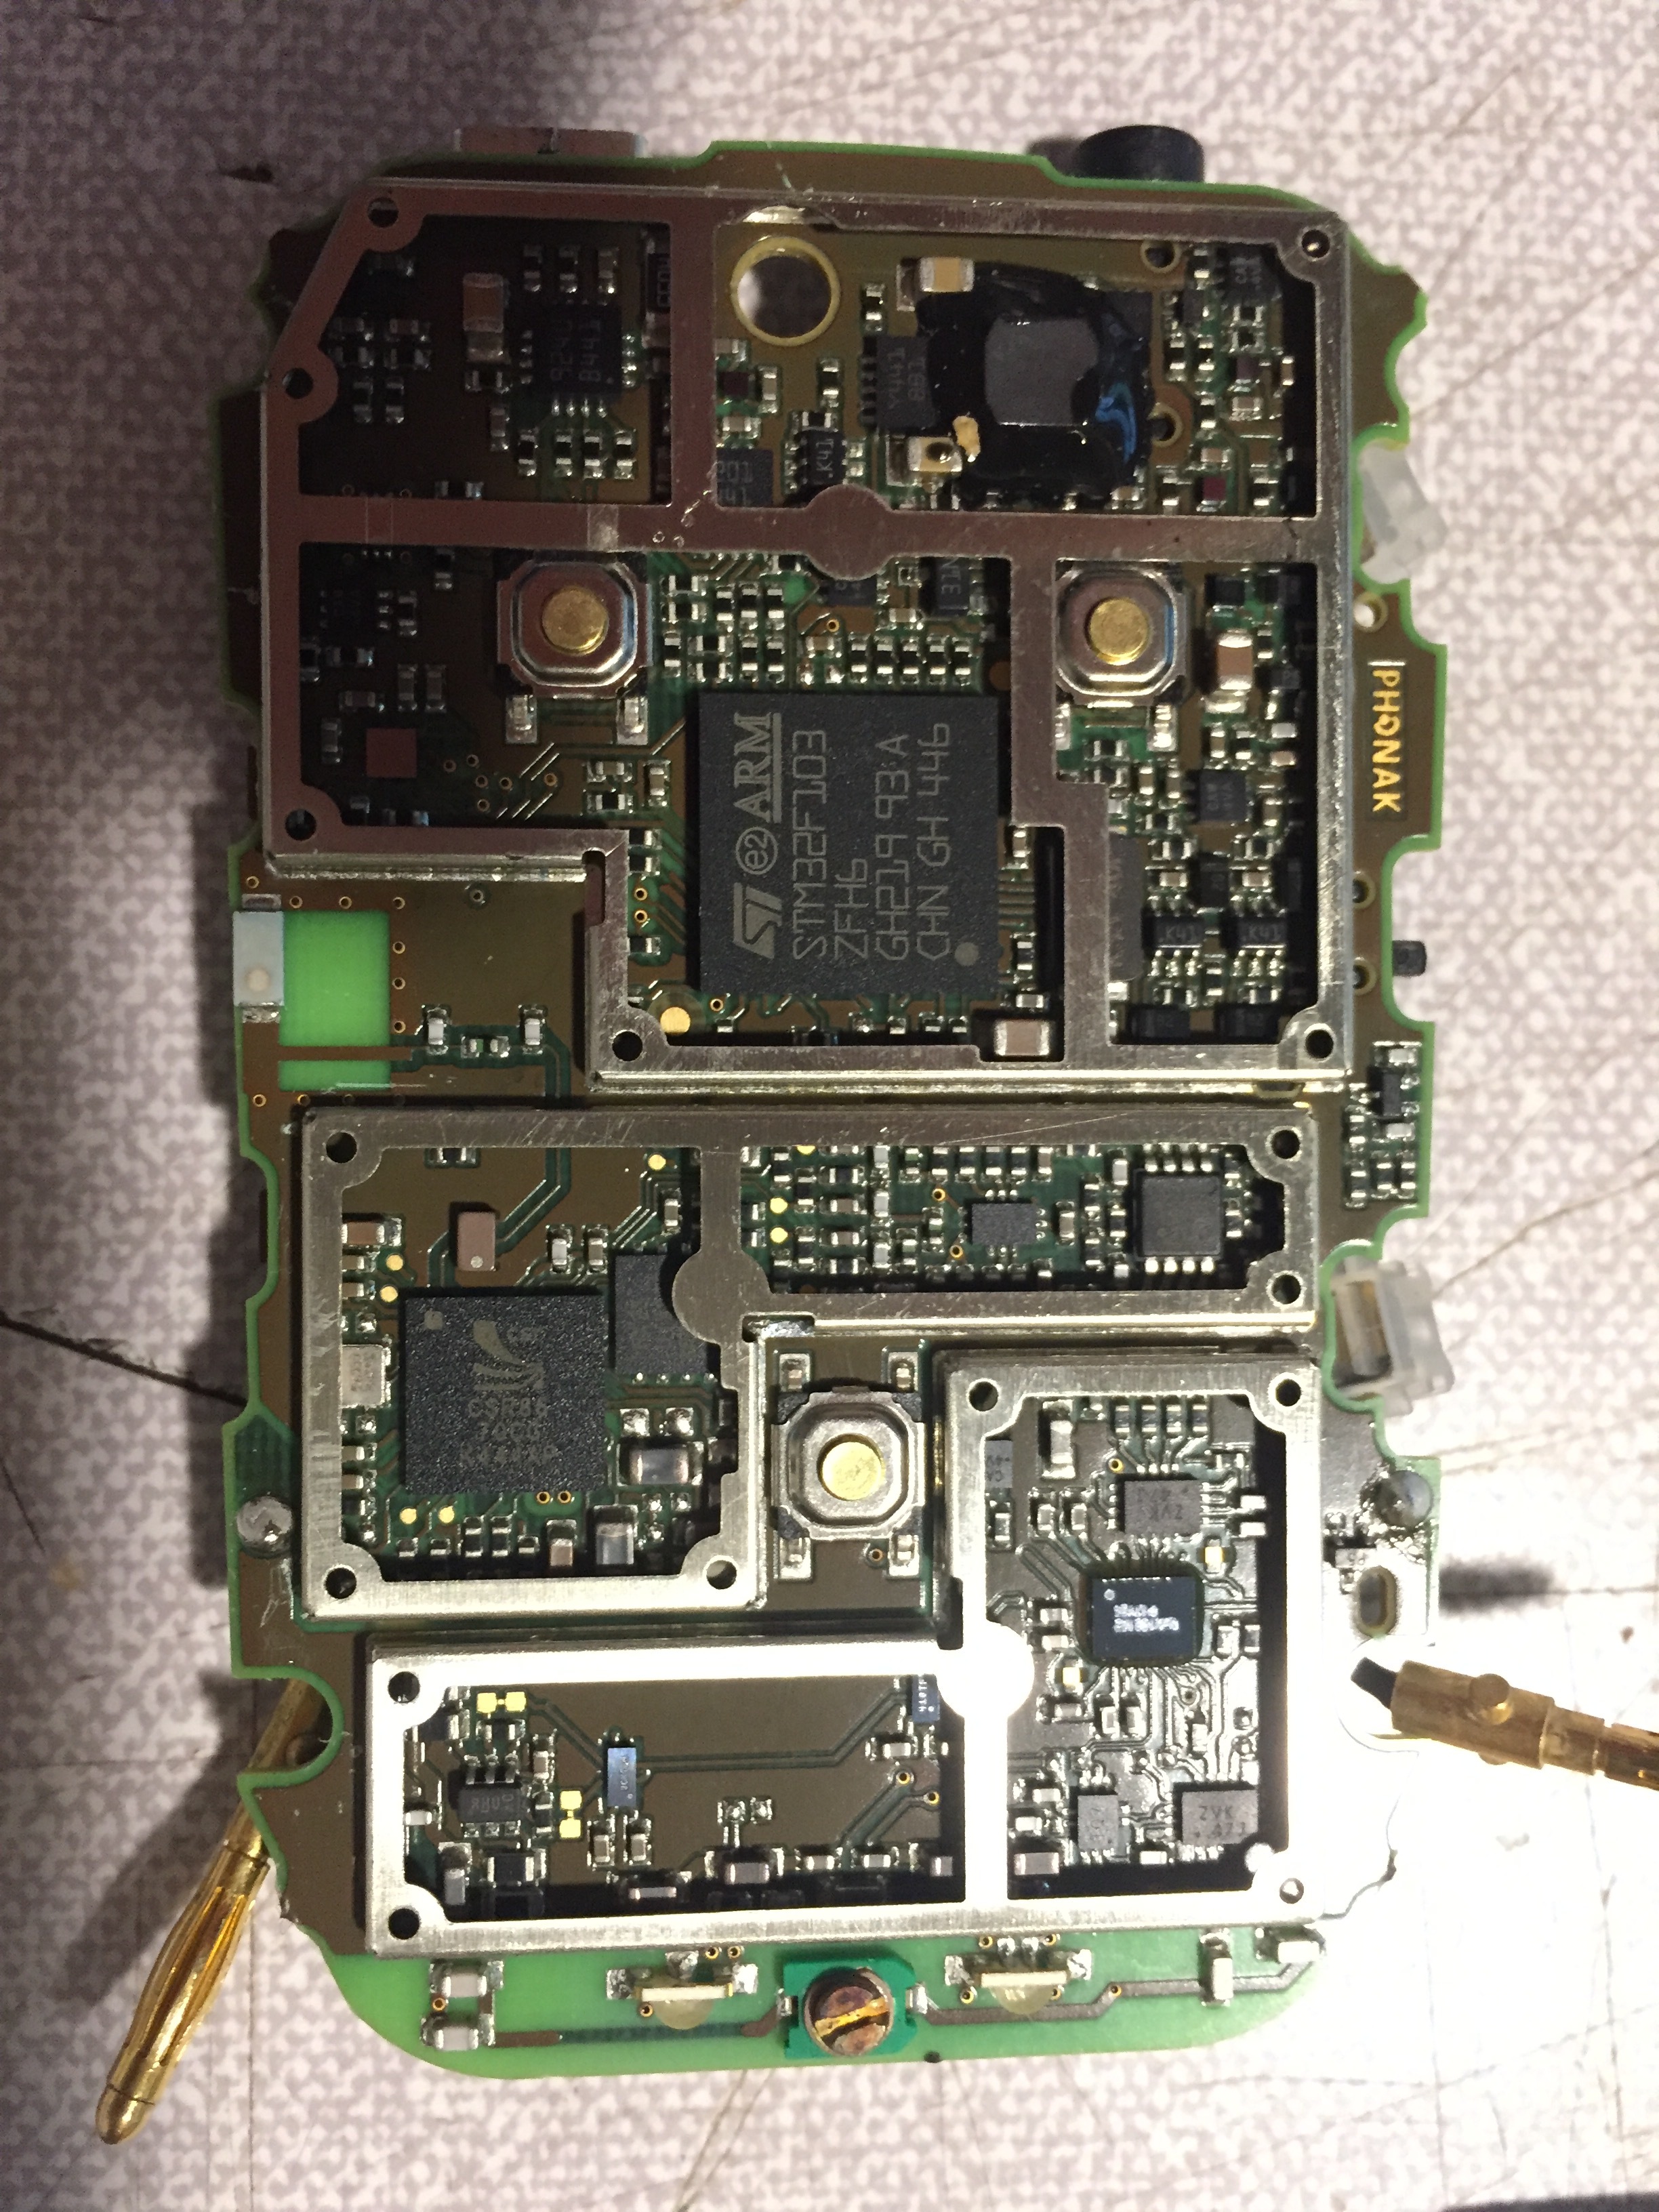
 I recognize the radio CSR - Cambridge Silicon Radio. Now a part of Qualcomm.
